SWEET PEA - BUNNY

SWEET PEA - BUNNY

Thursday, February 25, 2010

It's All About The Packaging!


I am constantly telling my sweet customers, that it is not about the gift, but all about the packaging! Okay, maybe the thought should be considered too. But in my opinion you could put a single chocolate Kiss in this lovely little box and get away with it. What sets it off is the 'flower' made from, once again....the Circle Scallop Punch. If you don't have this punch, you are missing out! (Call me and I will order one for you!)

Using the punched circle as your base, punch at least four more. (Designer Paper works a bit better since it is not as stiff as card stock.) You will cut those in half and fold them to form a cone shape. Glue Dots are perfect for keeping them together. You can easily fit seven of those cones onto the base. I placed a flat back pearl from our Pretties Kit in the center to finish it off, but the possibilities are endless. Maybe another row of cones, or a die-cut butterfly from the new Beautiful Wings Embosslits, or a button. You get the idea.

I think the person receiving this will overlook the fact that the gift inside is less important than all the 'love' that went into the packaging. If not, then scratch them off your list, they are not worthy!

Wednesday, February 24, 2010

I'm a Proud Sister and Mom!


Pardon me for a few moments while I brag just a bit. If any of you have spent any time with me at all, you have heard me talk about my family. They are all so important to me. This photo, taken last October, allows me to brag about two of them. My youngest daughter, Kim, is not only a fantastic teacher, but a cake decorator too! Standing next to her is my sister, Penny Thomas, who is holding a cake by Kim, celebrating Penny's accomplishment of making #21 in Stampin' Up's Top 100! What incredible talent they have! I am in awe of them both!

Versatile Template


Since I am not very creative, (see, if I can be a demonstrator, so can you!), I love having a template that I can change for any occasion and still have that 'WOW' factor that I love. Here are two versions of the same template, which I think is just perfect for that. I used this idea for a Christmas card too! Popping up the stars gives it dimension, and makes your eyes take in the whole card. Whoever you send it to will feel like you spent extra time making this just for them. And isn't that why we make cards?

Saturday, February 20, 2010

Awesome Pieces of Heart Stampers

Here are some pretty cards for your viewing and CASE-ing pleasure! (Please forgive the yellow lighting. My bad!) Like it says under my Blog name up there, Sharing What I Love...I love these!


This Valentine was made by Judy Sumner. It is a Criss-Cross envelope with a note card that pulls out. The designer paper, called Sending Love, is sparkly and textured. So pretty. Her talent blows me away. Notice her signature...not only is she a talented demonstrator, but a calligrapher too!


I have a bad habit of making my mind up about something before giving it a chance. That is what I did with the little scalloped die-cut notes, called Hugs, that Becca Sadler used on her sweet card. Now that I see what can be done with it, I have to order some. What a soft statement it makes with the pretty sentiment. Hugs to you, Becca!


This one was made by Patty Schnell. Have I mentioned that Rose Red is my FAVORITE Stampin' Up! color? I think this paper is so romantic. The Whisper White accent really makes it POP!

I think the first thing a stamper loves is making a pretty card. The second thing has to be receiving one! I have said before that our Pieces of Heart Stampers group is very special and very talented. They have MY heart!

Friday, February 19, 2010

Vintage or Dirty?


I'm not quite sure where I was going with this card. It started with the scalloped rose. I was stamping with my friend, (and awesome downline), Judy Sumner, who was using an old, yellowed dictionary for one of her projects. Her version of the 3-D flowers were so pretty and would be much easier to mail. But I have to make things harder and more complicated, so I tried it with the technique I showed on an earlier post, (February 4). I fell in love with the vintage look of those old pages once I had my 'rose', but I needed a card to go with it. Believe it or not, that is Pretty In Pink and Whisper White that I sponged with Soft Suede to give it that 'old' look. But I think I took it too far and now it just looks dirty to me. I had this idea that a Mr and Mrs were celebrating their 50Th wedding anniversary and were lovingly looking through all the cards they had received at their wedding while reminiscing their many years of being together. (I might watch the Classic Movie Channel too much. They really made great romantic movies back then!) Anyway, there is no way you could mail this, and I am not sure the recipient would understand the route I was taking. But I kinda like it and might just keep it for myself and pull it out years from now (I'm not telling you how many) on my 50Th anniversary and tell Steve it must have gotten stepped on.

By the way, if you would like to know how to make these flowers, you must come to my next camp, February 27th, where we will be making some 'cleaner' ones. Email to reserve a spot. pamdurso@sbcglobal.net

Like the real roses? My Valentine gave me those. I told you he was a keeper.

Tuesday, February 16, 2010

Top 'O The Mornin' To Ya!


With the Valentine candy eaten (OK, I had a little help), and the roses looking kinda droopy, it's time to think about...St. Patrick's Day!

This is a card I made last year using a stamp set that has since retired, but what I really wanted to focus on is the Leprechaun. Isn't he cute? He looks like he could be guarding the pot 'o gold at the end of the rainbow.

Punch art is all the rage right now and looking at the blogs these days, you can make ANYTHING using punches. This is a simple one. The punches I used were the scalloped circle, 5-Petal Flower, Key Tag, Word Window and various circles, and squares. I used the Uni-Ball Signo White Gel Pen to bring out the mischievousness in his eyes. All of that is held together with the 2-Way Glue Pen, which is a staple for any stamper. When applied right away, it will adhere immediately. If you let it sit until the blue tint of the glue turns clear, it allows you to reposition your piece until you are happy with it and then adheres tight. Wonderful stuff.

Hope you find your pot o' gold! If not, hope you find your glasses. I'm always losing mine.

Monday, February 15, 2010

My Valentine!


My Valentine Steve, bless his heart, is standing out in a snow storm grilling a steak because that is what I wanted for Valentine's Day. I don't know if you can see the thermometer behind him, but it is 20ish with a wicked wind. So with the wind chill, it has to be in the teens. (What you can't see is the glass of wine on the table to 'get him through it'.) Looking at him through the window, while I'm inside, nice and warm, I couldn't help but feel this was the epitome of love. He's a keeper! The steak was fantastic, by the way!

Friday, February 12, 2010

Quick Valentine


Did you receive a Valentine from someone you forgot to make one for? AEIGH! Quick, go get your Heart to Heart Punch and some pretty designer paper (from Stampin' Up! of course!) and start punching! Pretty soon you will have a sweet card that will make them feel very special. For an added detail, crimp the bottom, add some ribbon and you are done. This would be pretty for Mother's Day too.

I 'borrowed' this idea from my sister, Penny, who always keeps me on my toes with ideas. If you become a demonstrator with Stampin' Up!, we can both 'borrow' from her together! Join my Pieces of Heart Stampers team! = ^ ]

Tuesday, February 9, 2010

Snow Day!


Today is a snow day, otherwise known as a STAY HOME AND STAMP DAY!!! I think it is a law somewhere, so I HAVE to comply! It's a tough job, but someone has got to do it.

Sunday, February 7, 2010

Love You Much


I love making cards for Valentine's Day. The colors seem to get my attention, especially the Pretty In Pink and Close To Cocoa combination. I found this bright design on the Stampin' Up! demonstrator's 'Stamper's Showcase', originally by Susan Gillespie, on the front of a cookie bag she made. I thought it would work great for a card too. It uses the stamp set called Love You Much, which I think is a forgotten Valentine set. It also uses the textured designer paper called Sending Love. Each sheet has a glittery design that you can feel. Really pretty. I love the different size panels, and the pretty taffeta ribbon.

Thursday, February 4, 2010

Happy Birthday, Mom!


As a demonstrator for Stampin' Up!, I am very lucky to have access to a website where fellow demonstrators post their ideas. I never have to worry about my next card, because I can search this website and find just what I need. (Makes being a demonstrator just that much more attractive!!)
While looking through the awesome samples the other day, I came across these sweet flowers made by Mary Director, http://kreateskards.blogspot.com. I had to try them, and soon I had flowers all over the place! They are made using the scallop punch!
I needed a WOW effect for my mom's birthday gift (she turns 80 on February 6!). Using the pretty Tea Party Designer Paper and Pretty In Pink satin ribbon I think I got what I was looking for. I think they have that "Shabby Chic" look I love. Thank you Mary. I know my mom will love it too.

Wednesday, February 3, 2010

Valentine Camp

Here are a few of the projects we made at my last stamp camp and the wonderful, talented people who inspired me. We had a great time. If you weren't there (why???), we missed you.


How cute is this card? My all time favorite Stampin' Up! color is Rose Red. And lucky me, the new Sweet Pea (love that name) felt accents are in that pretty color. I saw a version of this on Julie Davison's great blog. The designer paper is called Sending Love, and with this card, I am!

This card, originally done by Tiffany Bauer in Real Red, is so romantic to me. My favorite stamp set, Well Scripted, from the new mini Occasions catalog, was used in Pretty in Pink. The edge of the card was made with the Pinking Hearts Border punch found in the same mini catalog.

One of my newest toys is the Big Shot Movers and Shapers. I used it with the heart window die to cut an opening on the front of this card. The sentiment, Sale-a-bration's Whimsical Words, peeks through it. Another awesome Sale-a-bration goody, the Scallop Trim Border punch was used under the satin ribbon. With Sale-a-bration you can get those items FREE!!!! This card was one I saw on the Stampin' Up! website, where demonstrators can go to get all kinds of ideas.

This idea came from Beth Beard. She used the Big Shot Petal Die with Christmas paper and ribbon. I knew it would be perfect for Valentine's Day too.

If you are thinking of becoming a demonstrator, Sale-a-bration is a great time to do it! The starter kit is reduced 15%! Plus, you will receive a stamp set of your choice valued at $47.95 or less for free! Don't delay any longer! Contact me now and we will get you started today. What could be more fun than by being surrounded by people who love to do the same thing you do...STAMPING!

Tuesday, February 2, 2010

Anniversary Card


Do you ever have one of those days where all the planets are aligned just right and everything falls into place without effort? I don't either. But I came close. This card practically made itself. I always struggle coming up with my own designs. That is why I consider myself a thief. If I see a card that appeals to me, I can then 'adapt' it to what I have on hand. Thank goodness there are lots of talented people out there that I can 'adapt' from!
This card, I am proud to say, is my own. I used Very Vanilla and Pretty In Pink card stock. I used my Big Shot Movers and Shapers Bigz Die (fun tool!) to make a large heart in Very Vanilla. Using the Big Shot again, I ran the Pretty In Pink card stock through with the Perfect Polka Dots Impressions Folder (gives you 'in your face' dots!). Punched that with the Full Heart punch and popped them up with Dimensionals. At the bottom, I used our new Pinking Hearts Border, so pretty. I used Pretty in Pink gingham ribbon around the heart and the length of the card. I know, it is retired, but in addition to being a thief, I am a ribbon hoarder, and it looked so pretty on the card so I used it. The Sale-a-bration Whimsical Words stamp set seemed to fit the feel of this card and I used Melon Mambo ink to make it pop.

Brayered 'Chocolate' Card


I came across a card on Robin Merriman's blog, Trinity Designs, at Christmas, where she used the brayer on our beautiful white Bride Specialty Paper. If you haven't considered using this paper, you really should check it out, (page 158). It is just beautiful. It has a design that gives you a crayon resist effect when you brayer it. I must have been hungry, because I immediately thought of CHOCOLATE and Valentine's Day. I used Close to Cocoa ink (of course, more chocolate!), and layered it with Whisper White and Blush Blossom card stock. The Chocolate Chip (Duh!) Satin ribbon brings it all together without taking away from the soft effect of the design. The Curly Label punch was used twice to elongate my sentiment. I cut one of the punched images in two and adhered it to the first one to give it a bit of definition.
I think the possibilities are endless. You can use any color ink you want to get the effect you are looking for.

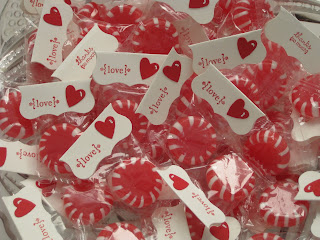
Mini Candy Topper


Here is a super easy way to make a 'topper' for individually wrapped candy. It can be adapted for any occasion. How cute for a baby or wedding shower favor!
I used the Curly Label Punch, #112208, Shimmery White Card Stock, #101910, Real Red Card Stock, #102482, Heart to Heart Punch, #119694, White Signo Gel Pen, #105021, and the Tiny Tags stamp set, #118592.
I just folded the punched piece in half and adhered to the cellophane of the candy.
I think they pack a big punch even though they are so small. (Inspired by my good friends, Josh and Carrie! Thanks, guys!)